My Phidget LED 64 - Advanced board had arrived a couple of days back.
As I indicated elsewhere, configuring my 'inputs' is now, no longer a concern for me. There are multiple options already available, and with Tripod's SuperScript Ver 2.00 almost on its final iteration, mostly, I'm going to use that tool for all input functions.
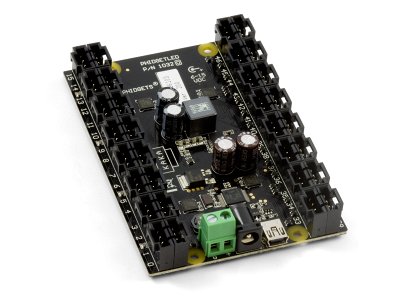
Did a little testing with my Phidget board today.
Unpacked the board, and powered it up. Connected two green LEDs on Pin 0 & 1. And fired up the Phidget configuration utility. The utility detected the board immediately. Configured the LED voltages and current values and voila, the LEDs lit up bright and shiny.
Fired up the FS2Phidgets utility developed by Alan from "MyCockpit.Org".
While FS2P detects my board correctly, but, despite spending many hours trying to debug, I'm not able to configure the board. The LEDs therefore continue to glow unencumbered by my efforts.
I now know what I need to do for next few days.
Read. A lot.
..and fix this (B)rat.
Showing posts with label FSX. Show all posts
30 April 2013
Tripod's SuperScript Ver 2.00
Tripod has been burning a lot of midnight oil, just to get the SuperScript Ver 2.00 up and running. Ver 2.00 of the script is now 'event driven' and is supposedly more efficient script.
Over the last couple of weeks, was beta testing a developmental script for Tripod. The script is appropriately called as 'SuperCartridge' is intended to add a 'Data Cartridge' functionality to the Super-Bug. Al Rosenberg, as always, is the technical expert on the correctness of scripts compliance with real world procedures. My job was primarily to test the script and just see if my computer doesn't blow up. The SuperCartridge is coming along very nicely, and when complete this is going to considerably add to the overall F/A-18E experience.
Yesterday night, Tripod sent me an advance copy of SuperScript Ver 2.00. Spent a large part of yesterday night looking at the documentation. This version provides a single point interface for both input and output functions.
Even though, this was the first time, I was looking at the documentation Tripod has created, I instinctively knew, this script is a 'winner'. I knew, I'm going to use it for all my 'input' functions. I don't even feel the need to test it. Having looked at this documentation, I know it will work.
My only concern now remains, configuration of flight sim outputs, to drive my LEDs.
While Tripod's script also provides output functionality, but, it's primarily coded in LUA. I have already committed myself to using output boards from Phidget, and these boards do not directly interface with LUA. They do however interface with FSUIPC.
Need to find a little more time, and learn how to mate Tripod's script with my boards using FSUIPC.
Labels:
cockpit builder,
FS2Phidget,
FSX,
home cockpit,
I/O Boards,
Interface board,
LED,
LUA Script,
Panel,
Phidget,
Super Script,
SuperCartridge,
Tripod
13 April 2013
Phidgets
Past few months, work has been a little more hectic than usual. What little free time (if any) was available, was spent with flying FSX. The pit build therefore has suffered since then.
Starting mid-May, my work takes me to a different city. Shifting my house, and getting setup at new place, will now take priority over everything else. Till end-June, I don't see this project progressing any further.
In the meanwhile, I'm more than ever convinced that, while FSUINO and Arduino are good, but they won't work for me. In the meanwhile, I have done a bit of testing with 'Phidgets' and this looks like (for me) a better implementation of output scripts. These boards interface with FSX easily using FS2Phidget script by Alan. The script can be downloaded from mycockpit.org
Just ordered myself a Phidget LED-64 Advanced board and Phidget Interface Kit (0/16/16).
While the LED board is a necessity, the interface kit is a bit of an overkill. For one, it provides with ability to add another 16 inputs, but the reason for my choice was its 16 digital outputs. Each output is rated for 200 milli-ohms and 2 Amps of current per channel and 30VDC voltage. While I can drive 64 LEDs with the LED board, each output channel on that board is only rated for a max of 10mA current.
Some indicators in the pit (like Master Caution, Fire Warning Lights, for example) are very big and bright annunciators. With the LED board, I didn't have enough current carrying capacity available to drive more powerful lights. With this interface kit, I will be able to overcome that limitation. Due to better current/voltage handling capacity of this board, eventually, if I ever decide to do that, I could also use these channels to drive servo's (a.k.a custom cockpit instruments like battery gauge, hydraulic pressure gauge e.t.c, or rudimentary motion control).
With this purchase, I have now collected about everything I will need for the build, with the exception of various cockpit knobs. Those will be a tough cookie to source. But, we will cross that bridge when we reach it.
In case I get stuck, my teen daughter is doing a research of her own. She has been collecting anything that remotely looks like a knob (fan regulator switches, broken rotary knobs from old electrical appliances, knobs sealing plastic bottles, including toothpaste tubes, shaving cream tubes and the like). She is confident, with a little molding using dried paper paste, plastic glue and color, she will be able to mold shapes that will look like knobs for me. Gotta love daughters.
Starting mid-May, my work takes me to a different city. Shifting my house, and getting setup at new place, will now take priority over everything else. Till end-June, I don't see this project progressing any further.
In the meanwhile, I'm more than ever convinced that, while FSUINO and Arduino are good, but they won't work for me. In the meanwhile, I have done a bit of testing with 'Phidgets' and this looks like (for me) a better implementation of output scripts. These boards interface with FSX easily using FS2Phidget script by Alan. The script can be downloaded from mycockpit.org
Just ordered myself a Phidget LED-64 Advanced board and Phidget Interface Kit (0/16/16).
![]() |
Phidget LED-64 Advanced |
![]() |
Phidget Interface Kit 0/16/16 |
Some indicators in the pit (like Master Caution, Fire Warning Lights, for example) are very big and bright annunciators. With the LED board, I didn't have enough current carrying capacity available to drive more powerful lights. With this interface kit, I will be able to overcome that limitation. Due to better current/voltage handling capacity of this board, eventually, if I ever decide to do that, I could also use these channels to drive servo's (a.k.a custom cockpit instruments like battery gauge, hydraulic pressure gauge e.t.c, or rudimentary motion control).
With this purchase, I have now collected about everything I will need for the build, with the exception of various cockpit knobs. Those will be a tough cookie to source. But, we will cross that bridge when we reach it.
In case I get stuck, my teen daughter is doing a research of her own. She has been collecting anything that remotely looks like a knob (fan regulator switches, broken rotary knobs from old electrical appliances, knobs sealing plastic bottles, including toothpaste tubes, shaving cream tubes and the like). She is confident, with a little molding using dried paper paste, plastic glue and color, she will be able to mold shapes that will look like knobs for me. Gotta love daughters.
Labels:
arduino,
cockpit builder,
FS2Phidget,
FSX,
home cockpit,
I/O Boards,
Interface board,
LED,
LED Board,
Phidget,
pit
13 December 2012
Unpacking the Warthog
The Thrustmaster HOTAS Warthog arrived today.
The package as received
Outer wrapping paper removed.
The 'core' is packed very nicely in 'big bubble' bubble packing paper
Bubble wrapping paper removed.
Outer box of the Warthog.
The box is labeled for delivery in India, of a product manufactured in China, sold to me by a US company.
The 'Inner Box'
I'm already excited.
Two inner boxes containing the throttle and stick
Inner cartons unpacked
Unpacking the 'Stick' carton
Opening the 'Throttle Carton'
Oouch!
The throttle thermocole-foam packing is damaged
(I repaired the damage with transparent scotch tape before repacking the throttle)
Throttle unpacked and unwrapped.
The build quality is stupendous. Feel of buttons is just 'awesome'.
Driving the Hornet on boat is going to be fun. I know that already.
Hotas Warthog
The 'Stick' unpacked but not unwrapped.
I am going to leave unwrapping to when I install the stick in my pit.
For the time being, my Saitek X-52 Pro will stay on duty.
More images, just so that I remember to repack the stick when I will have to move house, which I inevitably will have to. Soon.
Measuring dimensions for cutouts in the pit panels.
Labels:
airplane,
aviation,
flight control system,
flight simulator,
FSX,
home pit,
hotas,
stick,
throttle,
thrustmaster,
virtual aviation
02 December 2012
New Stick
This was something, that had been in my "thoughts" for a long long time.
I have had a 'Saitek X-52 Pro' flight control system with Saitek Pro Rudder Pedals. Been using the X-52 for more than four years now and the rudder pedals for a little over an year.
Though, I'm more than happy with the existing stick, but it is beginning to show age. I have to be careful with the connectors (the weakest link of X52). The stick has two 'detents' (idle and afterburner). Due to prolonged use and fair wear and tear, the afterburner detent has now withered away.
I had been considering a new stick for my pit for quite some time. Most pit builders have used Thrustmaster HOTAS Warthog for their builds.
The stick was released commercially sometime in 2010 and had been a 'must have' item on my list since then. I didn't consider this earlier, since it wasn't readily available in India.
Found an Indian website today, that had this stick in stock. It was almost an 'impulse' decision, and I decided to buy it.
"Warthog" is the best commercially available flight control system as on date. It's officially licensed by USAF. The immersion this stick provides can't get any better.
Labels:
cockpit,
cockpit builder,
flight control system,
FSX,
home cockpit,
home pit,
joystick,
pit,
Rudder Pedals,
Saitek,
thrustmaster,
virtual aviation,
Warthog,
X52
29 November 2012
Collecting items
Placed orders for following items.
I understand that items have been shipped and should reach in a week's time.
Labels:
arduino,
breadboard,
cockpit builder,
FSX,
header,
home cockpit,
LED,
leonardo,
missile switch,
missile switch cover,
pit,
protoscrew shield,
rotary encoder,
tactile switch,
virtual aviation
28 November 2012
Touch Panels still "touchy"
Had a little time on my hand today, so tested out both my touch panels today.
A detailed discussion on various causes of the malfunction is under progress on VRS forums.
I thank Glenn "Tripod" for all the help, support and guidance.
I also thank Al 'Otto' Rosenberg for his unsolicited offer of assistance. That was a very nice gesture from my FSX 'Guru'.
For the sake of brevity, I will cut the long story short.
Tripod was convinced that the problem on my 'test rig' is related to USB bus being underpowered. I tended to agree with him and have therefore already ordered a 'Belkin 7 port powered USB hub'.
Since, the powered USB hub will take a week to arrive, I decided to test out BOTH the touch panels simultaneously.
Connected my 21" monitor to the 3 X 23" monitor test rig, setup both the touch panels (one by one individually).
Windows detected both the panels, the controlling software also installed without any hitch.
Ran some tests on both the panels, including calibrating the panels (4 point calibration and 26 point linear calibration). All tests worked nicely.
To rule out 'USB power issues', I ran the panels while connected to the USB port in front of the computer, then in the rear of computer and then also through a unpowered USB hub. They work quite fine when connected to any USB port.
For the sake of test, I then removed the extra 21" monitor. And as expected, the driver failed to initialize.
Labels:
cockpit builder,
FSX,
home cockpit,
Layout,
multi- monitor,
Panel,
pit,
touch panel,
USB hub,
virtual aviation
25 November 2012
"Touched Panel"
Fixed the touch panel.
Tripod (from VRS Forums) provided me with extensive checklist to systematically debug this issue.
I chose the easiest and most likely problem resolution, and installed the 10.1" touch panel on my 15.1" monitor laptop (Dell XPS M1530).
The panel worked like a charm. I was able to calibrate the panel (4 point calibration and 25 point linear calibration) and it did everything that was advertised. The sensitivity of the panel is still a bit buggy, but that is something I will be able to tweak, as I dig deeper.
Like I had originally suspected, the problem is most likely due to 'Virtual Display Adaptor' installed by Triple Head 2 Go for my 3 screen test setup. The virtual display adaptor combines the individual resolutions of all of my three monitors to provide one single monitor of 3 x 1920 x 1080 = 5670 x 1080 resolution. Most likely the driver for touch controller is not able to 'handle' such a large resolution and quits on me.
When I connect the other single monitors to my test setup, I am now confident that my touch panel should work.
Thank you Tripod, for the leads you provided.
I'm happy that the panel now works.
On a secondary note, the vendor from whom I had purchased my multi-monitor stand, has fabricated a set of extension plates. Received those extension plates today. Will assemble the stand later in the day and test.
Adaptor for multi-monitor stand - for me to be able to accommodate 3 x 23" screens on the stand
Labels:
cockpit builder,
FSX,
home cockpit,
Layout,
multi- monitor,
Panel,
pit,
touch panel,
USB hub,
virtual aviation
24 November 2012
"Touchy Panel"
8.1" Touch Panel (along with touch controller, extender patch cord and USB extender cord
Both my touch panels arrived a couple of days back.
Luckily, both of them arrived in good shape this time (no chips, nicks, cracks or broken connectors this time). The package contained the driver CD also.
Assembled them immediately and connected them to my test rig. For some reason, my Windows 7 (64 Bit) is not able to recognize the touch panel controller device.
After extensive googling around for last two days, and not making any further headway, I have now requested folks at VRS forums for assistance.
The panels came with drivers from EGalax (5000 series). These are the most popular generic touch panel drivers. Also tested them with newer Touch Kit drivers. But, the operating system still doesn't recognize my USB device.
My test rig is presently setup with 3 x 23" monitors (other monitors are removed for the time being). All three monitors are fed off a Triple Head 2 Go through DVI input/output. With each monitor setup at 1920 x 1080 resolution, I am setup for a total desktop area of 5760 x 1080 (on a single virtual display adaptor).
I'm thinking, this extended display resolution is probably conflicting with the touch controller driver.
Over the coming weeks, time is at a bit of premium.
Need to find a way to get my panels to work!
Labels:
cockpit builder,
FSX,
home cockpit,
Layout,
multi- monitor,
Panel,
pit,
touch panel,
USB hub,
virtual aviation
31 August 2012
Cockpit Templates
Took a lot of work to get the 'to scale' cockpit layouts printed out.
The cockpit layout is available in the applicable extract of NATOPs manual for the Super Bug. If these drawings are blown up by 415%, one gets a scaled drawing of the cockpit layout.
Thank you Mark 'Wood' Stinson for sharing the drawings.
The cockpit layout is available in the applicable extract of NATOPs manual for the Super Bug. If these drawings are blown up by 415%, one gets a scaled drawing of the cockpit layout.
Thank you Mark 'Wood' Stinson for sharing the drawings.
The Console Panels
The Main Instrument Panels
(I have printed out two sets of each drawing. Just in case, one of them gets blown off)
Left & Right Coaming Panels
All of Them Together
Yay!
That is nice progress for today. I'm happy with the work.
It wasn't easy getting a lab to be able to print out such large drawings, especially at where I'm staying right now.
Labels:
cockpit,
cockpit builder,
FSX,
home cockpit,
home pit,
Layout,
Panel,
pit,
Printout of panels,
virtual aviation
Subscribe to:
Posts (Atom)